
Sep. 25, 2025
Welcome to IDEAL's ultimate guide to Essential Surface Roughness Chart: Symbols, Values, and Applications
Our blog is a comprehensive resource for anyone interested in learning more about this versatile and affordable option.
The surface roughness is a small detail with considerable impact on the mechanical part’s performance and longevity, particularly in cases where certain roughness levels are necessary to increase coating adhesion and ensure longevity. For this reason, it is imperative to define your surface roughness requirements for every application instead of leaving your mechanical part’s surface finish parameters open for interpretation.
Whether you are a procurement specialist or design engineer, or product manufacturer, having a clear and deeper understanding of these standard surface roughness values and how to achieve accurate surface roughness measurement is crucial to guaranteeing the product works as intended.
This guide delves into a detailed exploration of surface roughness and its importance in engineering. We’ll also discuss the standard surface roughness chart with basic symbols and values and their real-world applications. Get comfortable as we dive into details!
Overview of Surface Finish
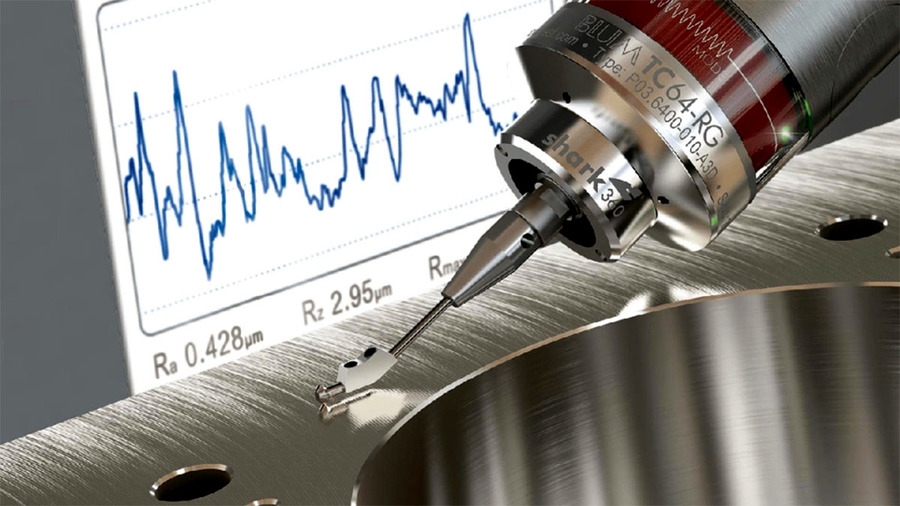
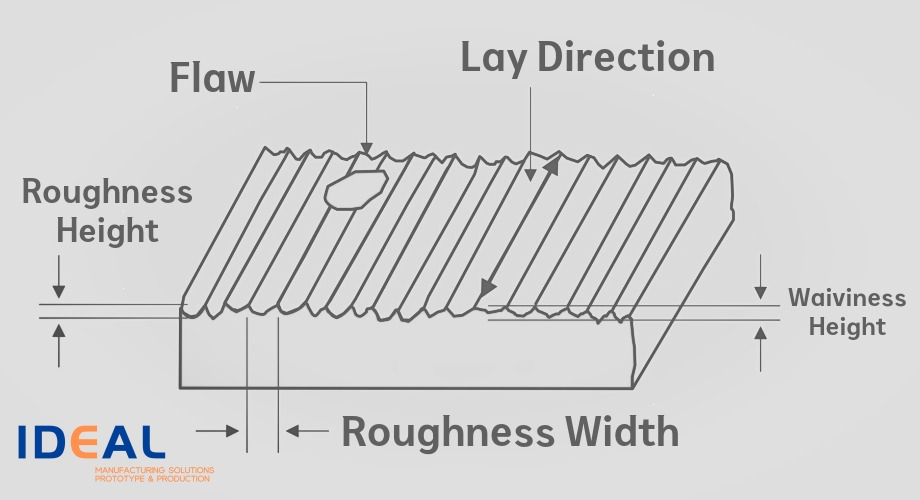
Whenever mechanical engineers and machinists talk about “surface finish”, they often imply properties of a surface, such as the texture. Surface finishing process involves altering the surface of an item by removing, reshaping, or adding to it. Product engineers rely on treatments like bead blasting, sanding, or grinding to control the roughness of a product’s surface. Core characteristics that define the complete texture of a manufactured item’s surface include surface roughness, waviness, and lay.
Surface roughness is the measurement of a surface’s total spaced irregularities. It is the measure of the relative smoothness of a surface’s profile derived through the microscopic deviations in a surface’s true form. It is the direct outcome of the adopted production process and machining material conditions. Also, it is a standard metric widely used by manufacturers and engineers to indicate how an object will interact with other elements, especially its working environment and influence factors such as aesthetics, friction, and wear.
Waviness is the warped surface with greater spacing than that of the surface roughness length. It describes irregular surfaces that occur at intervals beyond the surface roughness. Machining defects, such as chatter or warping from heating or cooling processes, are typical causes of waviness on the surface of manufactured items.
On the other hand, lay reveals the predominant surface pattern direction it takes. Surface lay pattern can be circular, horizontal, crosshatched, vertical, or perpendicular based on the adopted production methods.
Why Is Surface Roughness a Critical Element in Manufacturing Processes?
Surface roughness parameters have a significant impact on determining the reaction of a product to its working environment. Oftentimes, a product’s surface texture indicates the functionality of its components, and surface texture may impact its effectiveness depending on the real-world application of such an item.
Surface measurement is very useful in surface engineering. Thus, manufacturers and product engineers often maintain and monitor the surface finish closely to produce consistent and reliable products.
Surface finishes have varying effects. However, the most effective means to maintain the desired surface finish is by comparing it with the surface finish standards. Here are ways surface finish can be beneficial in machining processes:
Elimination of surface defects
Increasing conductivity and adding surface electrical conductors
Adding specific appearance appeal to a product
Improving chemical and corrosion resistance effects
Improves paint and coating adhesion
Enhances the strength of a product against wear, reduces friction, and heat transfer.
How Can You Measure Surface Roughness?
Surface roughness is a calculation of how much the actual surface deviates from a true, perfectly smooth surface. Ra is the standard numeric parameter that represents the average roughness. It is recorded in micro inches (µin) or micrometers (µm) and measures the average of how much the surface goes up and down over a specific area.
How irregular a surface is depends on how high or low the surface roughness value is. Nevertheless, the Ra surface roughness chart reveals the surface heights’ arithmetic average measured across a surface.
As mentioned earlier, roughness, waviness, and lay are three basic components of a surface. As a result, several factors influence the characteristics of surface geometry. As such, machinists leverage various measuring systems to calculate surface roughness. They include:
Direct Measurement Methods
It is a contact method that involves moving a diamond stylus over the surface of a machined component at a constant speed to measure its roughness. To achieve the right value, the machinists have to draw the stylus perpendicular to the surface and use a registered profile to measure roughness parameters. However, this process is slower, and a stylus might damage the product surface, introducing variation that wasn’t present initially.
Non-Contact Methods
This involves using non-contact procedures and instruments such as digital holography, confocal microscopy, and laser triangulation to measure rough surfaces on a workpiece. Machinists rely on optical instruments like white light and confocal because they use different principles for measurement than a physical probe.
The chosen instrument directs light onto the product surface and achieves reflections from a carefully-positioned reference mirror. You can use a camera to detect and capture a three-dimensional profile of the surface, then examine the reflected waves to gauge roughness parameters.
Comparison Methods
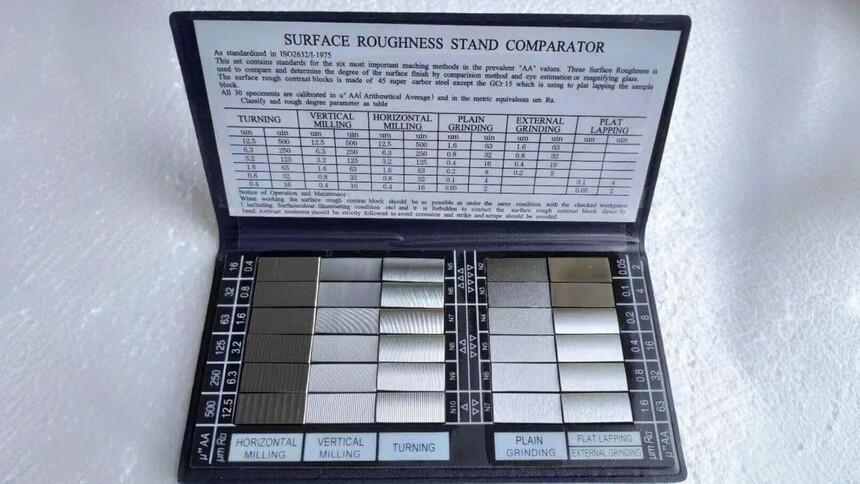
It relies on surface roughness samples generated by primary tools such as a surface roughness comparator. Then, the manufacturer or product engineer employs tactile and visual senses to sample the results against the surface of known roughness parameters.
In-Process Methods
This method relies on magnetic materials to assess surface roughness. Inductance and ultrasound techniques are typical in-process methods of measuring surface parameters. The inductance pickup utilizes electromagnetic energy to determine the distance to the surface. Then, the defined parametric value can help identify comparative roughness parameters.
Methods of Measuring Surface Roughness
Engineering experts rely on three primary methods and equipment to inspect the absolute values of surface roughness in mechanical parts.
Area Techniques
Area techniques measure the finite area of a surface to provide a statistical average of surface peaks and troughs. This approach is easier to automate and practice. Techniques employed in this inspection method include optical scattering, ultrasonic scattering, and capacitance probes.
Profiling Techniques
The profile method involves using an ultra-sensitive contact probe to examine the surface texture of an object. It possesses sensitivity similar to that of a phonograph needle. It is best suited for the procedure since a regular CNC probe may not be accurate enough to deliver such comprehensive surface evaluation.
Microscopy Techniques
These qualitative methods utilize contrast measurements to provide key information about peaks and valleys on a surface. Machinists use microscopy techniques to analyze surface finish. However, the tiny fields of view of this equipment limit its function.
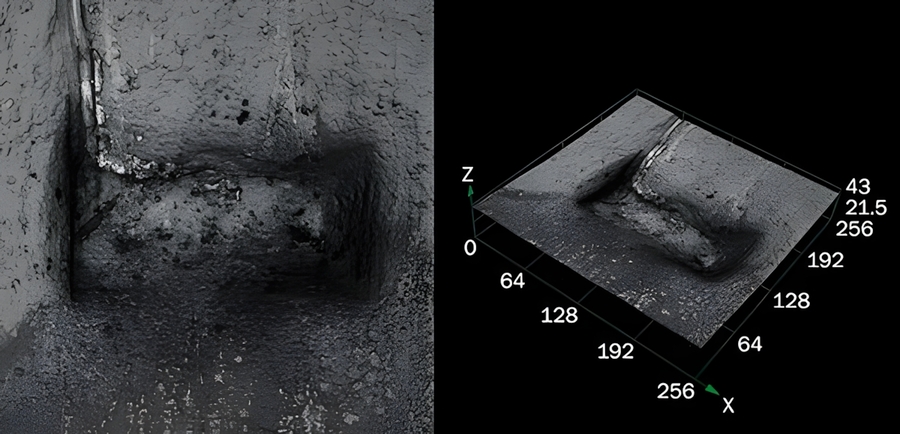
Electron microscopes can only observe a small piece of the surface at any given time because they work on a tiny scale. For this reason, you may need to perform several scans to establish average roughness parameters.
Surface Roughness Chart Symbols and Abbreviations
Mechanical engineers use various measurement units to show parameters in a surface roughness chart. Below are some of the commonly used surface finish symbols and terminology:
Ra – Roughness Average
Roughness average (Ra) or centerline average (CLA) refers to the average roughness between the mean line and a roughness profile. It is a widely used parameter for determining surface finish. The Ra surface roughness scale presents standard Ra values common in engineering.
RMS – Root Mean Square Roughness
RMS roughness refers to the root mean square average of the peaks and valleys of a surface. The RMS roughness indicator uses more math and points on the surface, making it more accurate than Rz roughness.
Rv – Maximum Profile Valley Depth
The estimated distance between the lowest valley and the mean line of a profile within the evaluation length.
Rz – Average Maximum Height/Altitude of the Surface Profile
Rz estimates the average value of the five largest vertical distances between the lowest valleys and the highest peaks. The measurement involves using five roughness sampling lengths to eliminate errors since Ra can be insensitive to certain extremes.
Rmax – Vertical Distance between Peak and Valley
The Rmax is a roughness parameter that calculates the vertical distance between the peaks and valleys on a surface and detects anomalies like burrs and scratches that might not be obvious from the Ra surface finish chart. Rmax is more sensitive to these abnormalities and is best for identifying a surface’s maximum roughness within the evaluation length.
Surface Roughness Chart
| Roughness Grade | Ra (µm) | Ra (µin) | Typical Manufacturing Process |
|---|---|---|---|
| N12 | 50.0 | 2000 | Flame cutting, sand casting |
| N11 | 25.0 | 1000 | Rough machining |
| N10 | 12.5 | 500 | General machining |
| N9 | 6.3 | 250 | Drilling, turning |
| N8 | 3.2 | 125 | Milling, shaping |
| N7 | 1.6 | 63 | Fine turning, boring |
| N6 | 0.8 | 32 | Grinding |
| N5 | 0.4 | 16 | Fine grinding, honing |
| N4 | 0.2 | 8 | Honing, lapping |
| N3 | 0.1 | 4 | Super finishing, lapping |
| N2 | 0.05 | 2 | Mirror lapping, polishing |
| N1 | 0.025 | 1 | Optical quality polishing |
The machining surface finish chart presents absolute roughness values for measuring standard surface finish parameters. It is a reliable reference material to guarantee quality in various manufacturing processes.
Since mechanical parts experts use different techniques to examine the machining surface finish chart, it might be difficult to choose the ideal process according to the product’s performance.
Surface Finish Conversion
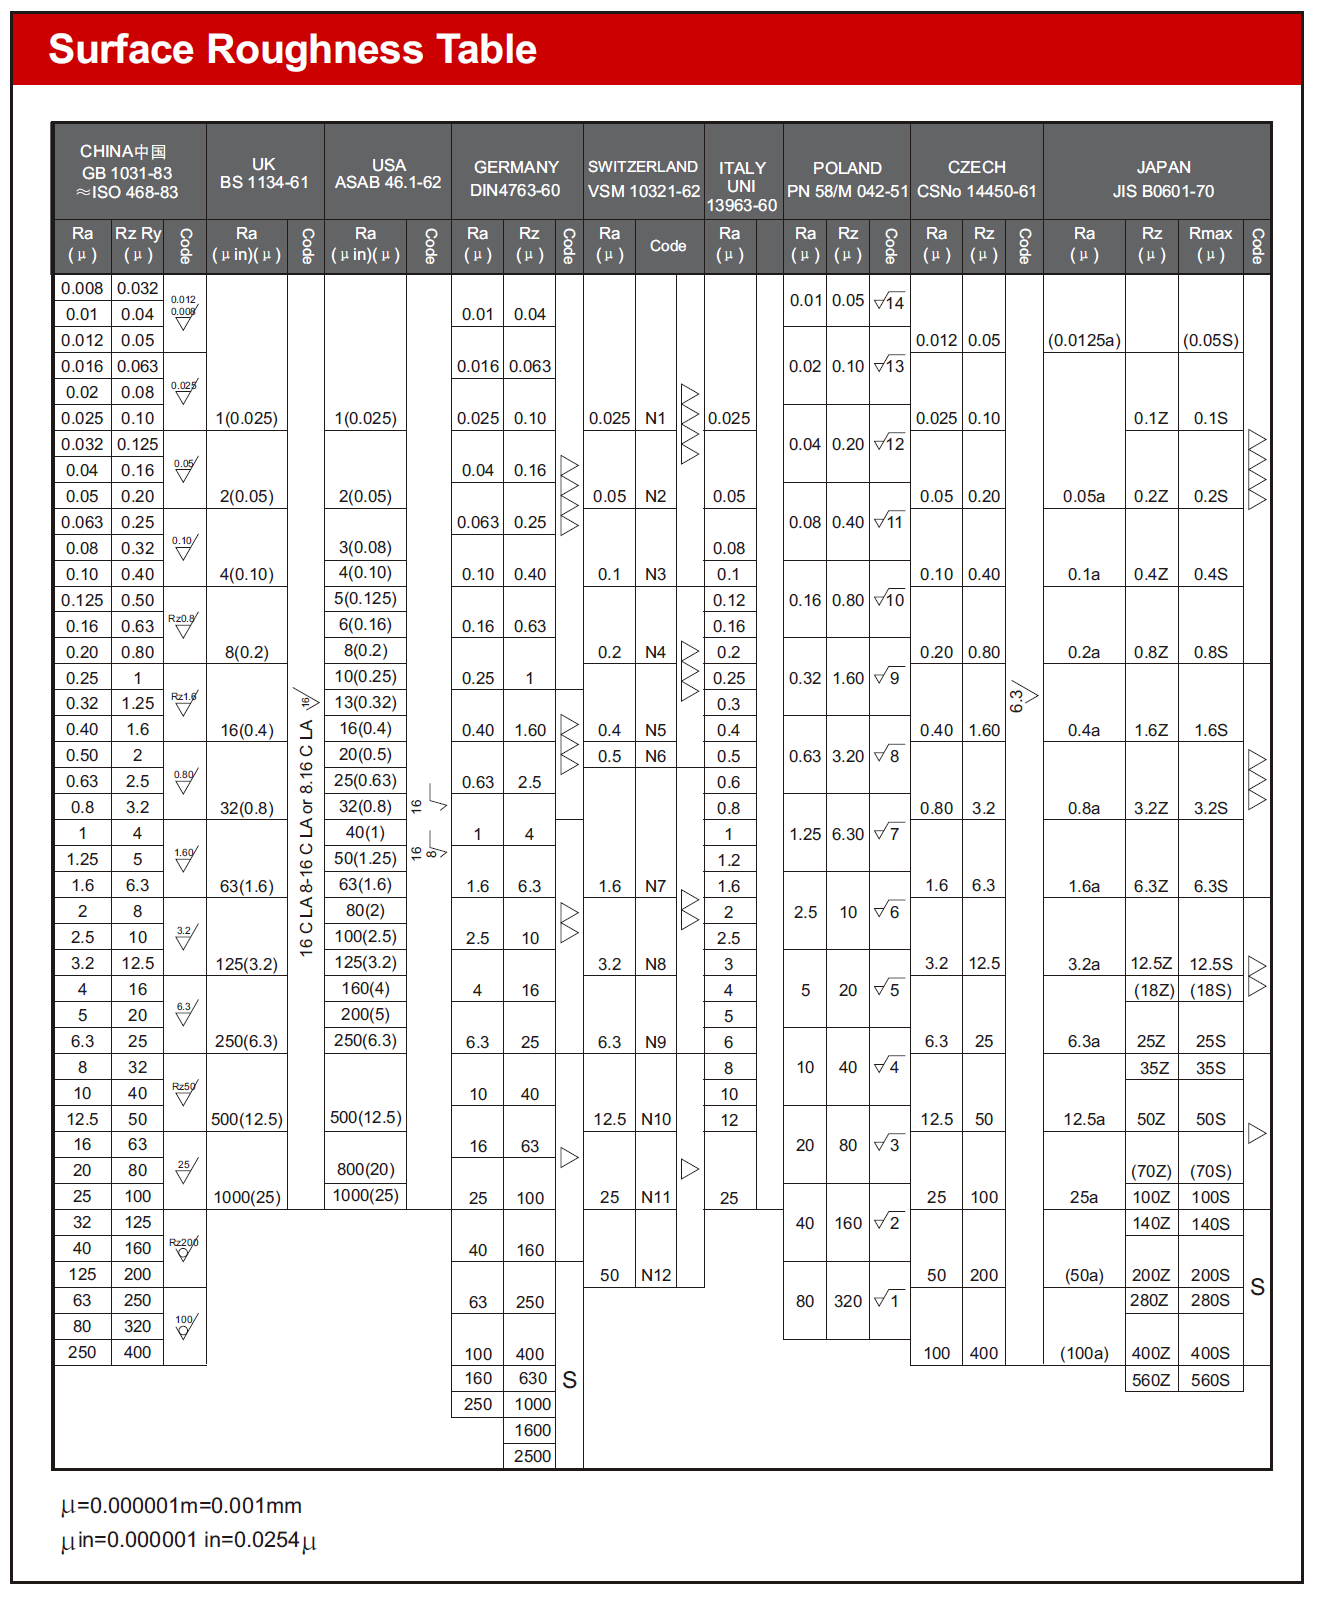
Here is a well-planned table of the surface roughness comparison chart that helps you to assess various roughness scales such as Ra, Rz, and RMS- across multiple manufacturing standards and procedures. Let’s get familiar with some of the abbreviations you might encounter in the conversion chart as we dive into it:
Ra: Roughness Average
RMS: Root Mean Square
CLA: Center Line Average
Rt: Roughness Total
N: New ISO (Grade) Scale Numbers
Cut-Off Length: Length Required for Sample
Factors Affecting Surface Finish Roughness in Machined Parts
Key parameters that often influence the machining surface finishes of various components include:
Chosen Machining Process
The chosen machining process is a key determinant of the roughness on a workpiece surface. Each cutting process inherently offers a distinct level of roughness. In some situations, techniques like broaching, drilling, or sawing can introduce irregularities to a workpiece surface, especially when the tools are worn or the materials are extremely hard.
Machinists often leverage the vast capabilities of the grinding technique since it delivers the finest finish. Similarly, milling methods like climb milling deliver lighter shearing forces to create a clean and smooth surface.
Coolant Option
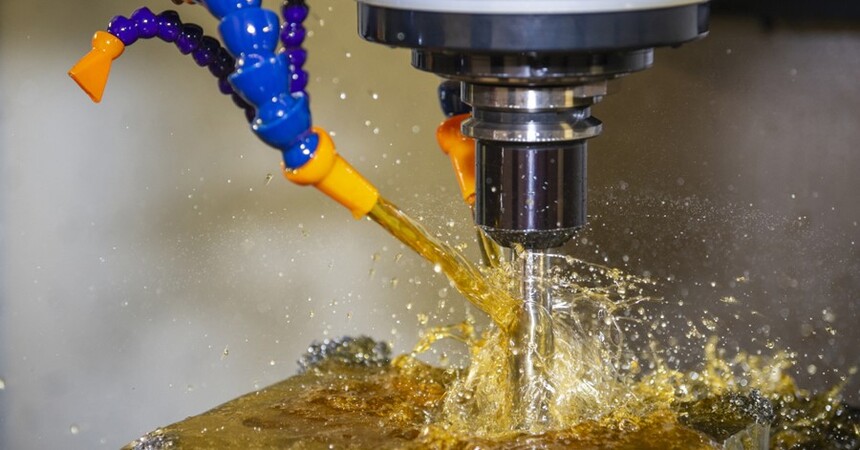
Generally, coolants help to eliminate friction throughout the machining operation and minimize generated heat to ensure better tool life and desired surface finish. The heat generated during the CNC machining process affects the roughness of a machined part.
High-pressure coolant can help enhance a workpiece’s surface finish, even though it is not efficient in all machining operations. Machining experts often recommend using the right coolant that meets the needs of your workpiece and machine tool. Moreover, right cutting fluids lubricate the contact surfaces of the workpiece and the tool to maintain normal temperature and reduce wear.
Machining Parameters
Depth of cut, feed rate, and cutting speed are critical machining variables that impact the quality of a workpiece’s finish. In several machining operations, machinists record lower surface roughness with high speeds, while the value of maximum roughness increases with more depth of cut.
However, other variables such as material properties, feed rate and tool geometry can also influence the level of roughness. More importantly, define the minimum material removal requirement when generating tool paths for your machining project.
Vibrations
Various elements, including loose machine setup, worn tools, or poor workholding, can result in tool path misalignment and workpiece deformation.
Vibration characteristics such as amplitude (how strong) and frequency (how fast) determine the smoothness or roughness level of the finished surface. The average roughness levels increase significantly with higher amplitude, causing deeper and uneven marks and grooves. For this reason, it is essential to monitor vibration during machining to achieve superior and durable mechanical parts.
This guide has discussed everything you need to understand about surface roughness to ensure top quality in your mechanical products. To control the roughness of your mechanical products and achieve desired characteristics, ensure that to define your surface roughness parameters in your technical drawings.
RA Surface Finishes for Various Manufacturing Processes
There are several industrial processes manufacturing companies execute to fine-tune the surface of their products. Methods involved in surface finishing vary with different manufacturing processes. Each method has various effects because surface finishing is a broad industrial process.
For example, there are different metal cutting processes, and each process has its surface finish process. This highlights the importance of a surface finish chart.
The first step in choosing surface finishes is identifying an industrial process capable of producing the desired surface texture and predominant surface pattern. Also, the process to be adopted should be cost-effective for commercial purposes.
The image below contains a table showing one example of surface roughness charts. It shows the relative roughness of various manufacturing processes:
| Manufacturing Process | Surface Roughness Ra (µm) | Ra (µin) | Notes |
|---|---|---|---|
| Flame Cutting / Sand Casting | 25 – 50 | 1000 – 2000 | Very rough surfaces |
| Sawing | 3.2 – 25 | 125 – 1000 | Depends on blade type |
| Milling / Turning (Roughing) | 1.6 – 12.5 | 63 – 500 | General machining |
| Drilling | 1.6 – 6.3 | 63 – 250 | Typical hole finish |
| Milling / Turning (Finishing) | 0.8 – 3.2 | 32 – 125 | Fine machining |
| Grinding | 0.2 – 1.6 | 8 – 63 | Achieves fine finishes |
| Honing | 0.1 – 0.8 | 4 – 32 | Improves roundness & finish |
| Lapping | 0.025 – 0.1 | 1 – 4 | Very fine finish |
| Polishing / Superfinishing | 0.012 – 0.05 | 0.5 – 2 | Optical / mirror finish |
Conclusion
This guide has discussed everything you need to understand about surface roughness to ensure top quality in your mechanical products. To control the roughness of your mechanical products and achieve desired characteristics, ensure that to define your surface roughness parameters in your technical drawings.
Contact IDEAL whenever you need help assessing the manufacturability of your product designs.

Search Blog

Hey there, I'm Abby!
At IDEAL RAPID PRODUCTION, I'm a Project Management Expert in custom manufacturing field for more than 15 years. We offer cost-effective machining services from China. Ask for a quote for your ongoing or upcoming projects now!


Aluminum Extrusion Design Guide
Dec. 29, 2025


GET IN TOUCH WITH US
Navigation
RESOURCE
Contact Us
Tel: 0755-36957776
E-mail: info@idealrp.com
WhatsApp (Sicily Liu): 86 187 2026 0265
Whatsapp (Fay Wang): 86 135 2877 3620
Add.: 4F, Building 1, Jinxinno, No. 50, Baolong 2nd Road, Baolong Community, Baolong Street, Longgang District, Shenzhen 518116
Add.: Room 4, 16/F, Ho King Commercial Building, 2-16 Fa Yuen Street, Mong Kok, Kowloon, Hong Kong
